


Table of Contents Show
Taking photos with sparklers using an iPhone can create some really fun and impressive images, especially during night-time celebrations like the 4th of July or New Year’s Eve. Here’s how to take sparkler photos with your iPhone:
1. Prepare Your Equipment
- iPhone: Make sure you have a recent iPhone model with a good camera.
- Tripod: Use a tripod to stabilize your phone. Long exposure shots require the camera to be as still as possible.
- Sparklers: Have your sparklers ready and ensure you have something to light them safely.
2. Choose the Right Mode
- Live Photo Mode: This mode on your iPhone can be used to capture movement with the sparklers. It’s not a long exposure, but it can create a nice effect with the moving light.
- Long Exposure: Use an app that allows for long exposure photography. The iPhone’s built-in camera app doesn’t support long exposure times needed for traditional sparkler writing photography, so you may need to download a third-party app that does, such as Slow Shutter Cam or Manual.
3. Set Up Your Scene
- Location: Find a safe, dark location where the light from the sparklers will stand out.
- Background: Try to have a dark or uncluttered background so the sparkler trails are the main focus of the image.
- Safety: Ensure there’s nothing flammable around, and that you’re in a safe area to use sparklers.
4. Camera Settings
- Focus: Lock the focus where the sparklers will be. You can do this by tapping and holding on the screen where you want to focus until you see the AE/AF Lock.
- Exposure: Adjust exposure if necessary by sliding your finger up or down after locking focus to make the photo brighter or darker.
- ISO: Keep it low to avoid grainy pictures. In third-party apps, you can manually adjust ISO settings.
- Shutter Speed: For long exposure apps, set the shutter speed to a few seconds, depending on how long you want the exposure to be.
5. Taking the Photo
- Start with a Test: Before lighting the sparklers, take a few test shots to make sure your focus and exposure are set correctly.
- Light the Sparklers: Once you’re ready, light the sparklers.
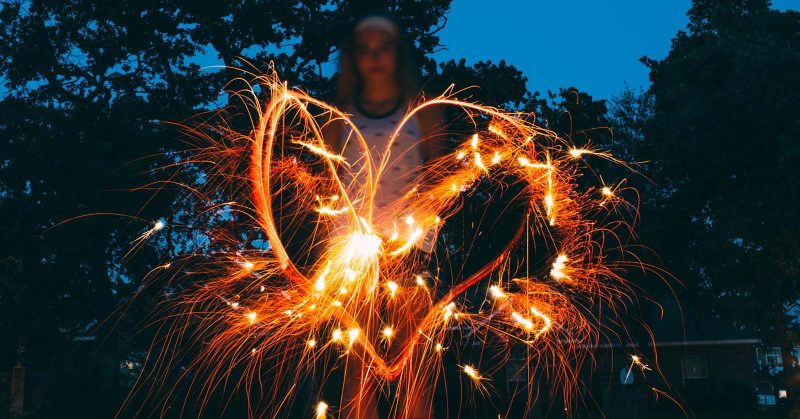
- Steady Movement: Move the sparkler steadily to write words, draw shapes, or create patterns. The slower you move, the brighter the line will be.
- Use the Timer: The iPhone’s built-in timer gives you a few seconds to get ready after hitting the shutter button. This is particularly useful if you’re also the one holding the sparkler.
6. Edit the Photo
- Live Photo Effects: If you took a Live Photo, swipe up on the photo and select the “Long Exposure” effect to blur the motion into a single image.
- Photo Editing Apps: Use photo editing apps to adjust the contrast, brightness, and color to make the sparkler trails pop.
7. Safety First
Always keep in mind that sparklers can be dangerous. They burn at high temperatures, so make sure to handle them responsibly, keep a safe distance from others, and have water or a fire extinguisher nearby just in case.
FAQs
Q1: Can I take sparkler pictures with any iPhone model?
A1: While newer iPhone models with better camera capabilities will yield the best results, you can take sparkler pictures with any iPhone that supports Live Photos or with a third-party camera app that allows for manual control of the exposure settings.
Q2: Do I need a tripod to take sparkler pictures?
A2: A tripod is highly recommended for stability, especially when shooting in low light conditions or when using long exposure techniques. However, if you don’t have a tripod, you can place your iPhone on a stable surface or hold it very steady.
Q3: What is the best mode to use for taking sparkler pictures on my iPhone?
A3: For a quick and easy way, you can use Live Photos and apply the Long Exposure effect. For more control, using a third-party app that allows for long exposure settings will be best.
Q4: How can I ensure my safety while taking sparkler photographs?
A4: Always use sparklers in a safe, outdoor space away from flammable materials. Keep a bucket of water or a fire extinguisher close by, and don’t hold the iPhone too close to the sparklers.
Q5: How do I make the sparkler writing appear clear in the photo?
A5: Move the sparkler at a steady pace without stopping and try to make the shapes or letters as consistent as possible. Use the iPhone’s burst mode or a long exposure setting in a third-party app to capture the entire motion.
Q6: Can I take these photos solo, or do I need help?
A6: It is possible to take these photos by yourself using the iPhone’s timer function. However, having someone else to either hold the iPhone or the sparkler can make it easier and allow you to focus on creating the desired effect with the sparklers.
Q7: What third-party apps are recommended for long exposure photography with an iPhone?
A7: Apps like Slow Shutter Cam, Manual, and Lightroom with its long exposure feature are popular choices that give you more control over the camera settings.
Q8: How do I edit the sparkler photos taken with my iPhone?
A8: You can use the built-in editing tools in your iPhone’s Photos app to adjust the exposure, contrast, and saturation. For more advanced editing, apps like Adobe Lightroom or VSCO offer a wide range of editing options.
Q9: Is it possible to capture sparkler pictures in a well-lit area?
A9: It’s best to take sparkler photos in a dark or dimly lit area to ensure the sparkler’s light stands out. Bright environments may wash out the sparkler’s light, making it less visible in photos.
Q10: How long should the shutter speed be set for sparkler photography?
A10: The shutter speed can vary depending on the effect you’re going for. Generally, a shutter speed of a few seconds will capture the motion of the sparkler. Adjust the time depending on the complexity of the design you’re trying to capture.
Include these FAQs at the end of your article or in a sidebar to give readers quick answers to common questions about taking sparkler photos with their iPhones.
Conclusion
By using these techniques, you can capture some beautiful images of sparkler art with your iPhone. Remember that it might take a few tries to get the perfect shot, so don’t get discouraged and keep experimenting with different movements and settings.